Site survey checklist
A ‘site survey’ can be defined in many ways. So to be clear: this section is about capturing the information needed to help you and your client end up with a great display result.

Even then you have two options:
-
Capturing enough information so that our team can give you a price and a proposal;
-
Capturing accurate and sufficient detail to allow bespoke materials to be ordered and an installation plan to be made with absolute confidence.
But the site survey has to be more than a passive data collection - it’s just the first step in defining what a great result looks like. We use the DISCAS standard to help establish image size and position relative to viewing distances (closest and farthest) and angles (horizontal and vertical). We use the ISCR and PISCR standards to define image quality in terms of delivered contrast ratios. And we use a plethora of other AV standards, environmental standards and global best practice standards too.
Recommended tools:
-
Pen and paper (yes, traditional tools are the best here!)
-
Tape measure
-
Laser measure (optional, but very useful)
-
Steel rule (if fine details are to be captured)
-
Illuminance meter (ambient light, measured in lux). Our key partners are given one free. We also can lend them. Free smartphone apps are also available.
-
Colour temperature meter. Specialist use only, but recommended when VC (video conferencing)
-
Luminance meter (used to measure existing displays, as appropriate, in candela per square metre [cd/m2] also known as ‘nit’). These are expensive, especially if you need to measure/calibrate colour.
-
Camera/smartphone/video

Room details (mechanical)
Create a room plan or plans so as much of the following is captured:
-
Floor dimensions
-
Ceiling height
-
If suspended ceiling, height of structural ceiling above
-
Details of objects in the ceiling void that might affect projector and screen mounting (eg heating, ventilation, cable trays etc)?
-
Detailed record of all obstructions and their dimensions (columns, ceiling features etc)
-
Carpet, wall and ceiling colours and finishes
-
Construction details of locations where any equipment will be mounted (eg plasterboard, brick, steelwork etc).
-
Will mounting positions need any reinforcement?
-
Plan of viewer locations, if known.
-
Are viewers seated?
-
Is the room tiered?
-
Window positions, sizes and orientation (eg north/east/west south facing)?
-
Details of blinds or shading. Sealed edges in side tracks, or free hanging?
-
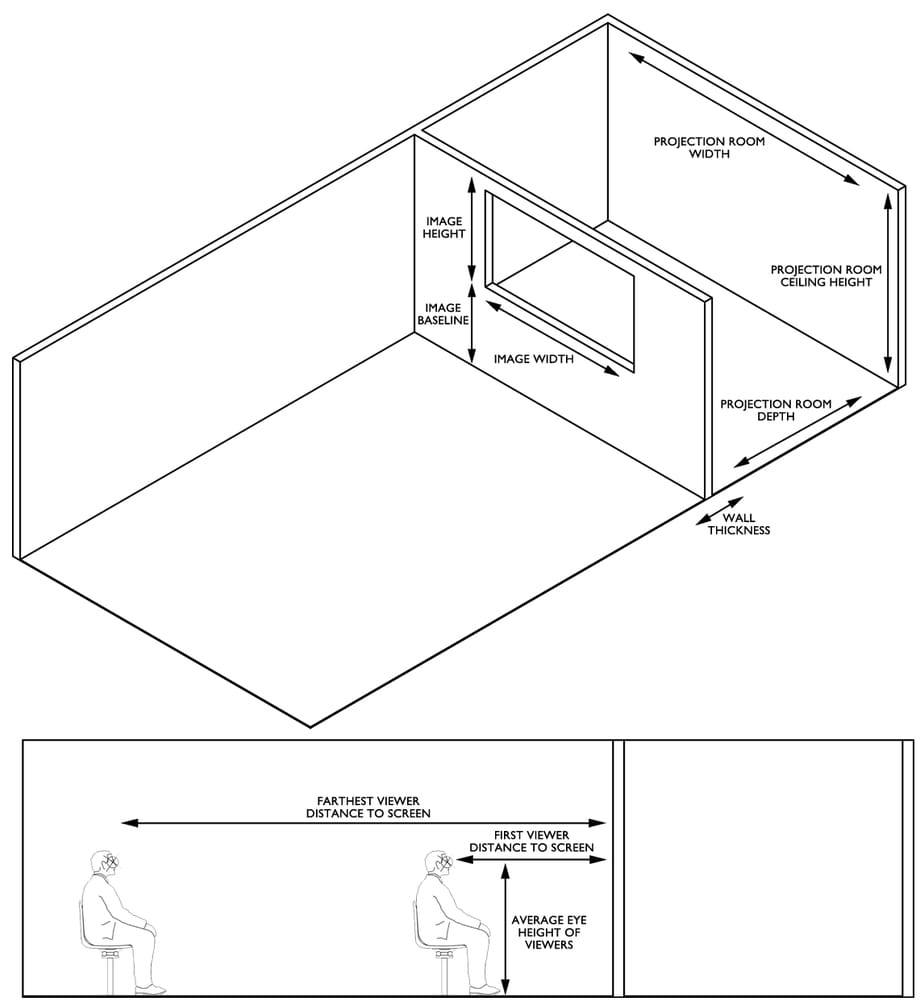
For rear projection systems, also capture the same details again for the projection room, plus:
-
Depth/thickness of wall the screen is mounted in
-
Details of how rear projection screen is, or can be, mounted in the wall
-
Differentials in levels between this and the main room
-
Environmental, particularly lighting
Lighting systems and natural light can be image killers. Use this checklist to identify problems areas - in particular those you can improve.
-
Measurements of ambient light at top/middle/bottom of image, with meter back against the screen
-
Measure ambient light at workplane positions (eg desk, table etc) with meter laid on back
-
Description and detail of lighting system
-
Direct or indirect luminaires?
-
Are there any direct or point source lighting luminaires facing the image
-
What can be done to reduce any direct lighting on the screens
-
-
Impact of natural light on image
Screen/image details:
-
Image size (if known)
-
Image baseline (distance from bottom of image to floor
For more advice, get in touch, we are always happy to help and at any time you can commission us to do this for you (please see Request a Site Survey).